Starknet Basecamp - Week 1

Last week, I had the chance to attend the first-week lesson of the Starknet Basecamp, organized by StarkHubTR, to bring new developers into the Starknet ecosystem. This bootcamp, which will last for 7 weeks, is a fantastic opportunity for anyone interested in Starknet and Cairo. We kicked off this week with a 2-hour intensive training on the basics of Starknet and Cairo.
So, let's take a step-by-step look at what was covered in the first-week lesson 👀
Cairo 101🧡
To quickly introduce it, one of the most important features that sets Cairo apart from other programming languages is its ability to provide a Validity Proof alongside the result when code is executed. I'll delve into what Validity Proof is and, more importantly, what it is not in the following sections of this article.
For now, let's try to understand what this proof serves us with an example.
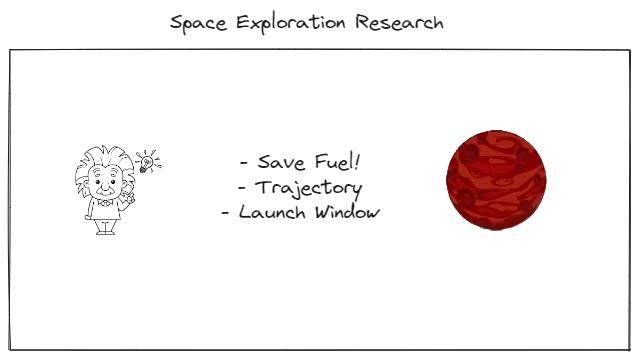
In this example, let's assume that we are the person in charge of managing space exploration research conducted in our country. As you can imagine, during this exploration, we need to find solutions to several key problems:
How do I achieve fuel efficiency?
When is the best launch window?
What should be the initial angle for takeoff?
The solution to complex problems with multiple intricate conditions like this often requires high computational power and the need for an algorithm that provides this solution.
Let's assume that you and your team have brainstormed and developed an algorithm in the Rust programming language that could potentially solve this problem.
But what if we don't have a computer with enough processing power in our country?
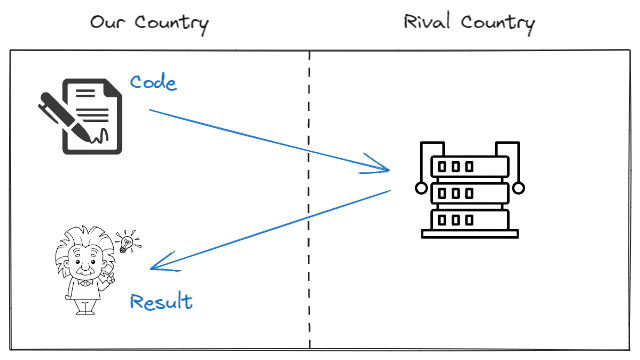
If we don't have access to a computer capable of handling this computation, we might need to seek assistance from teams in other countries. However, in such a scenario, even if we were to provide our code to another country and have them execute it on their supercomputer, how much can we trust the result?
What if the rival country:
Has a problem with its supercomputer?
A malicious team member sabotages our code?
Because we can't trust the rival country 100%, we'll never find answers to such questions.
What if we write the code in Cairo instead of Rust?
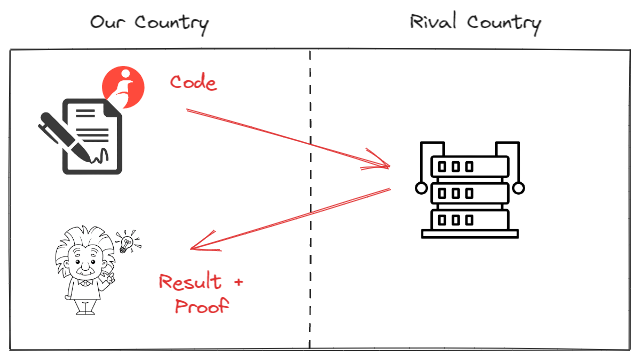
As mentioned in the introduction, when code written in Cairo is executed, it provides us with a proof alongside the result. From the rival country, we can request this proof alongside our code's result, allowing us to verify whether our code was executed by our desired conditions. If our code was not executed as we intended, whether intentionally or unintentionally, we can check this using the proof we have and deem the result invalid. This way, with the code we wrote on a regular computer in our own country, we can use the rival country's supercomputer without any trust issues. In other words, this is where Cairo's Validity Proof comes into play, ensuring that the results produced by executing the code are verifiable and trustworthy, even when the code is run on a different system. It provides a level of confidence in the results, allowing us to collaborate with other teams and share our code without concerns about the integrity of the computation.
In summary,
Cairo allows us to write provable programs.
This cryptographic proof is generated alongside the result.
This proof reveals any tampering or errors in the code.
Thus, an ordinary computer can keep a supercomputer honest.
STARKNET 💫
Before we delve into Starknet, let's briefly discuss the scalability problem, which is currently one of the most significant issues with Ethereum. I'm sure if you're reading this, both you and those around you have likely complained about the gas fees on Ethereum. During the NFT craze on the Mainnet, users were often required to pay hundreds of dollars in fees just to mint a single NFT.
So, why is Ethereum facing such problems when it comes to scalability?
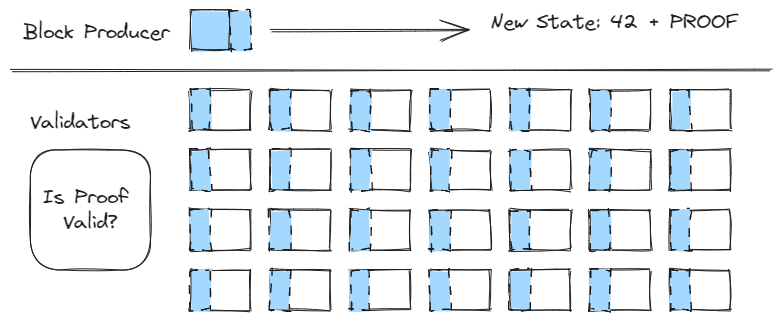
On a blockchain, every block producer must inform other validators of the state of each new block they produce. To simplify, let's assume our new state is 42. Validators who learn about the new block state must individually verify the block producer's state on their own computers. This process results in significant costs on the blockchain.
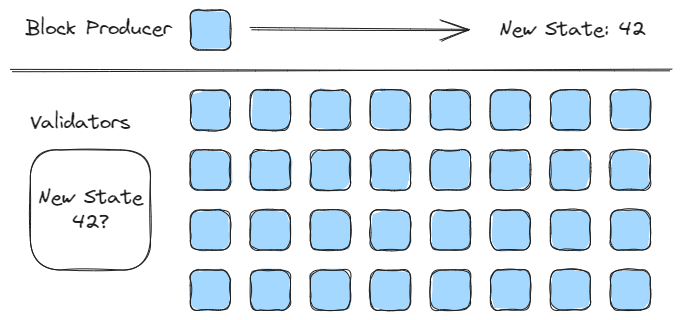
Run it once, verify it everywhere!
In Starknet, when block producers report the new state, they also provide a proof of this state to the validators. This way, validators don't need to re-run the same block (execution); all they have to do is verify the cryptographic proof they received from the block producers. Compared to the process described above, it's safe to say that this process requires significantly less effort.
Execution vs Verification
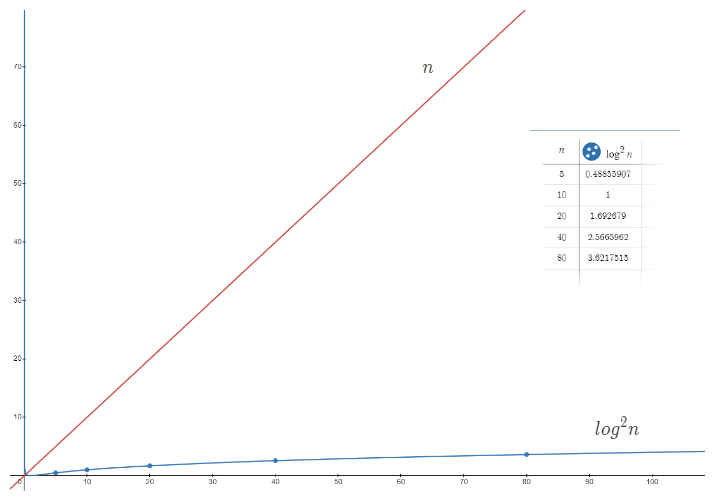
We've seen the execution and verification mentioned earlier. Now let's look at the relationship between these two and try to mathematically understand how much computational power we save by performing verification instead of computation. For example, when generating the validity proof for a computation that requires n operations, we need to perform log^2n verifications to verify it. As you can see in the graph below, there is a polylogarithmic relationship between computation and verification. While the number of computations increases linearly, verification approaches its limit logarithmically on its own axis, and the difference between the two lines increases as n approaches infinity. To put it more plainly, as the gap between these two increases, the power expended to produce a new state decreases.
Validity Proofs
Validity Proofs are cryptographic proofs used to verify a state transition. They ensure the correctness of computational integrity using Zero-Knowledge Proofs (ZK Proofs). In other words, they guarantee that a specific result is obtained at the end of a computation given a certain input, and they do this without needing anyone else's involvement.
Starknet falls under the Validity Rollup category, and as the name suggests, it uses STARKs, not SNARKs.
STARK vs SNARK
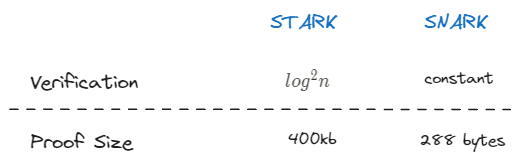
When we compare STARKs and SNARKs, we see that SNARKs have an advantage in both verification and proof size. In SNARKs, regardless of how complex the computation is, verification is always a constant value. However, in STARKs, as explained earlier, verification increases logarithmically as complexity increases. In terms of proof size sent to Layer-1, SNARKs are also much smaller compared to STARKs.
When we look at these two comparisons, you might be wondering why one would consider choosing STARKs over SNARKs. Let's update the table above and take another look at the situation,
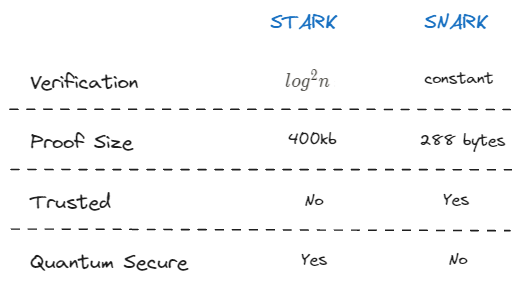
As mentioned earlier, STARKs can operate without requiring trust in a specific entity, as opposed to SNARKs, which rely on a Trusted Setup. Furthermore, STARKs are quantum-resistant, while SNARKs are not. This makes STARKs particularly attractive from a security perspective, even if they may come with slightly higher costs in certain cases.
We've examined the differences between STARKs and SNARKs. Now let's try to understand why Starknet chose CairoVM over ZK-EVM.
This situation needs to be considered from both sides. On one hand, there are projects like zkSync, Scroll, Polygon zk-EVM, and others that prefer to work in compatibility with the Ethereum Virtual Machine (EVM) but may lag behind in terms of performance. On the other hand, Starknet has chosen to prioritize performance by departing from this compatibility and using its own virtual machine, CairoVM.
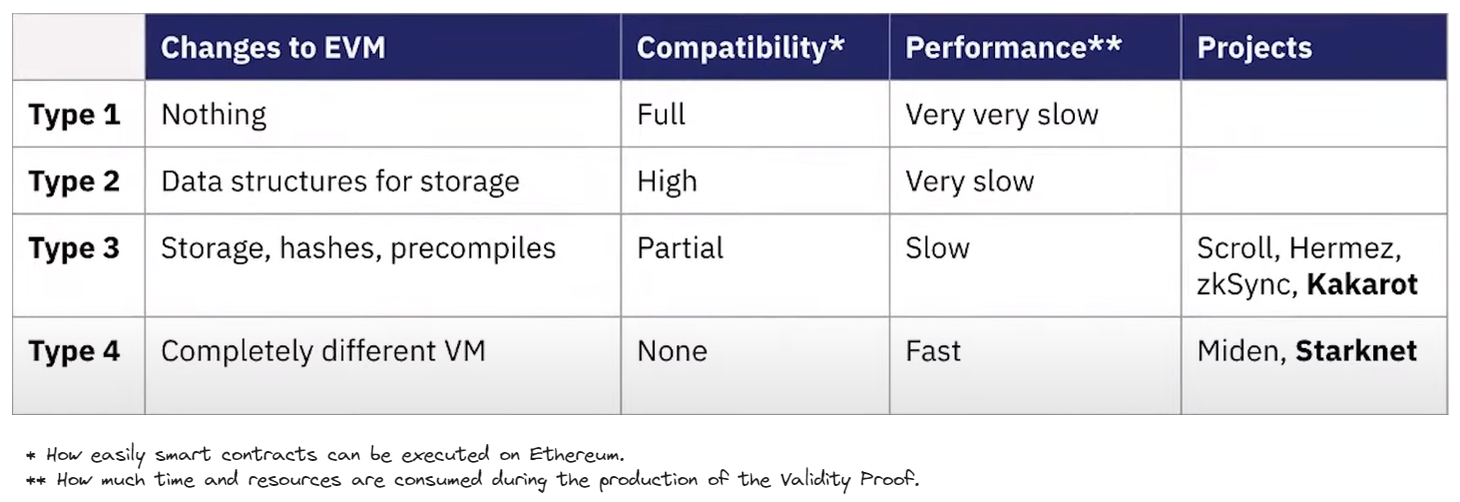
If we look at the classification provided by Vitalik regarding zk-EVMs, Starknet falls into the category of the 4th type of project. 4th type zk-EVMs, as mentioned earlier, use a completely different virtual machine and sacrifice compatibility with the EVM in favor of significantly improved performance compared to their counterparts in other categories.
STARKNET ARCHITECTURE 101 🏗️
Recalling our initial story, we were able to verify that the result was 42 without needing to use the rival country's supercomputer or trust them.
But how can other countries verify our results?
The answer, as you might guess, is STARKNET! 🎉
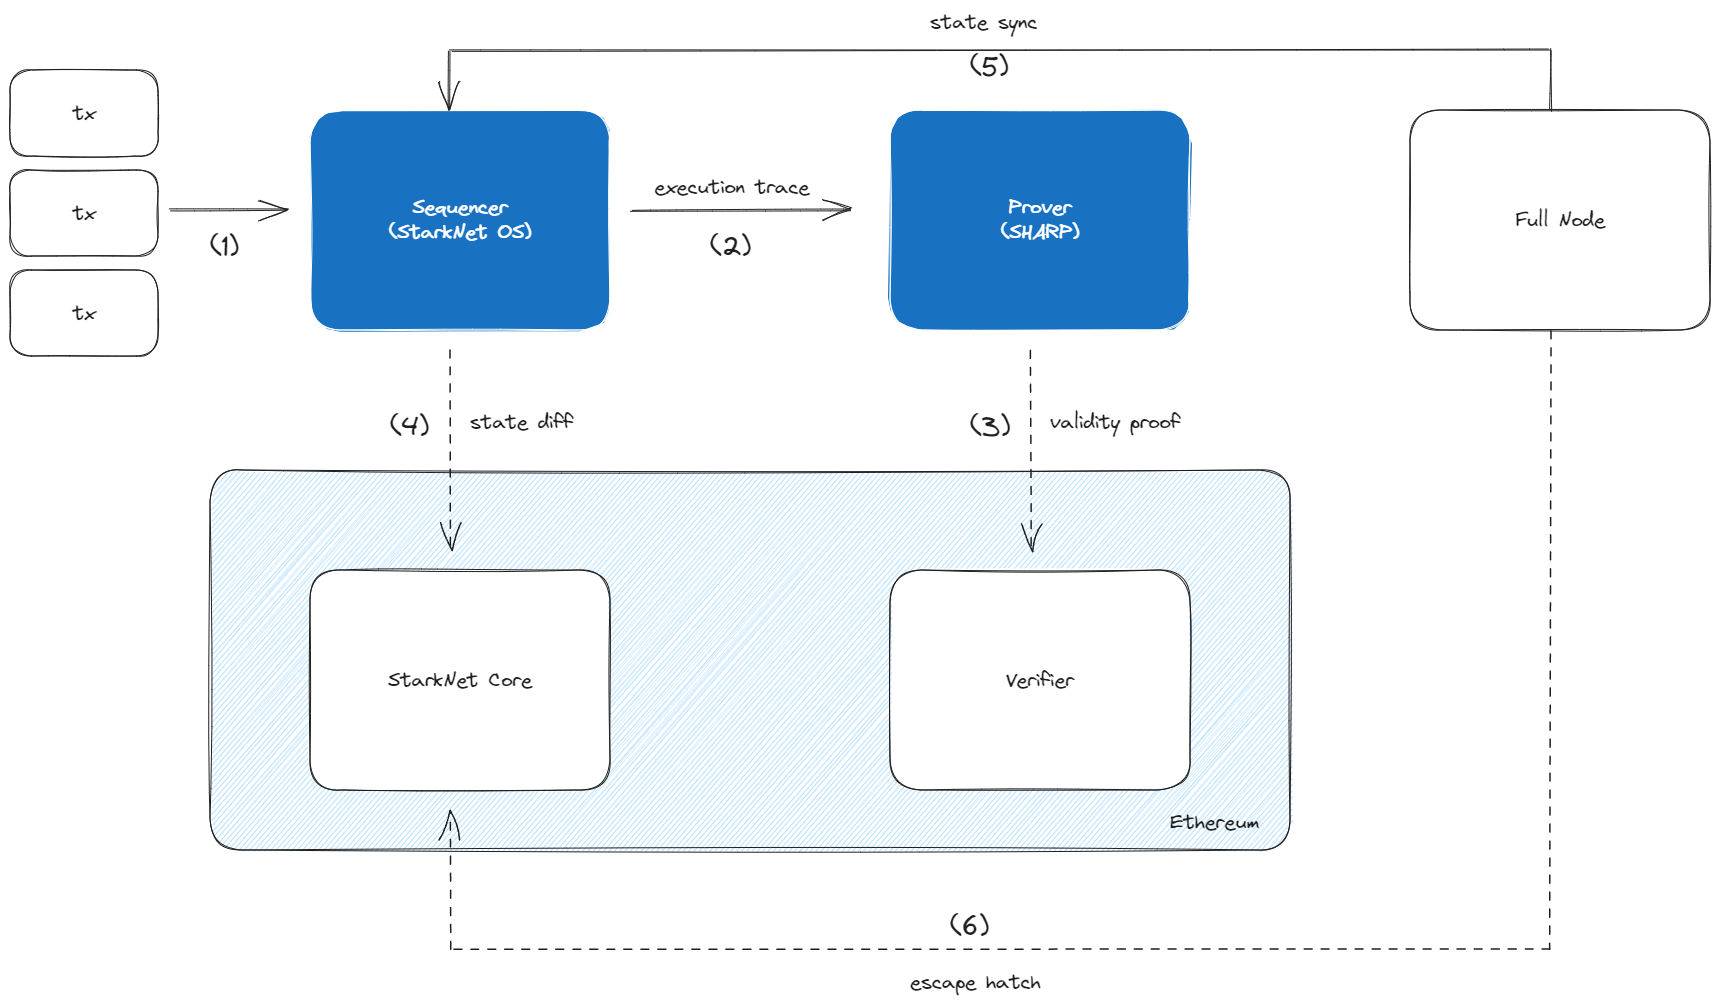
Starknet, as mentioned in various parts of the text, is a Layer-2 solution designed to scale Ethereum. When a transaction is performed on Starknet, it is sent to a block producer called the "Sequencer" (1). The Sequencer receives these transactions and verifies them. During this verification process, the Sequencer checks various conditions, including:
Does the user have the authority to perform this transaction?
Are the signatures correct?
Can the user use this account? etc.
After verifying all these conditions and similar ones, the Sequencer segregates these transactions into blocks and calculates the new state based on the operations performed in these blocks. We can liken this process to the block producers on Layer-1, as discussed earlier.
All these calculations are sent to a Prover called "SHARP" for verification (2). This transmission is referred to as an "execution trace." After SHARP conducts the verifications and generates a Validity Proof, it is sent to Layer-1. On Layer-1, the verification occurs in a smart contract called "Verifier" (3). Once verification is complete, it triggers the Sequencer and calculates the difference between the state before and after executing the block on Layer-1, sending this information to another smart contract called "Starknet Core (DA)" on Layer-1 (4).
These transmissions to Layer-1 are made as call data and can interact directly with smart wallets.
At the end of this process, Full Nodes on Starknet update their state through the Sequencer (5). If there is any issue between the Sequencer and Full Node, as a backup plan, Full Nodes can directly read the necessary information from the Starknet Core smart contract on Layer-1 (6). This way, data can be generated independently of any adverse situations on Layer-1.
STARKNET CONTRACT DEPLOYMENT 💼
After all this technical reading, we can't finish without getting our hands a little dirty. So, let's create a simple smart contract on Remix and deploy it to Starknet to conclude our discussion.
To do this, we first need to set up the Braavos wallet in our web browser and claim our fake Ether on the testnet. If you've used an EOA like Metamask before, it's a similar process, but I'll explain each step in detail assuming you're using an EOA for the first time. 💃
- First, go to https://braavos.app/ and click the "Download" button to download your wallet as an extension for your browser.
Next, we'll set up our own Braavos wallet. To do this, open your Braavos wallet and select "Create a New Wallet." Then, choose a password, copy the provided Seed Phrases, and store them in a secure location. These Seed Phrases will be necessary to access your wallet later. Please make sure you store them in a place where no one can access them and do not share your Seed Phrases with anyone! 🚧
💡Also, don't forget to select the Starknet Goerli Alpha network. We'll be deploying our smart contract on the testnet.
- Let's claim our testnet Ether from the Starknet faucet. Thanks to these fake Ethers, we'll be able to deploy our contract on the Goerli.
- If you haven't encountered any issues during wallet setup and faucet usage, then it means we're ready to create our smart contract. For now, to avoid dealing with an installation process, we'll deploy our first smart contract using Remix. To do this, first, go to https://remix.ethereum.org/. Then, activate the Starknet plug-in by clicking on the plug-in icon at the bottom left and searching for it.
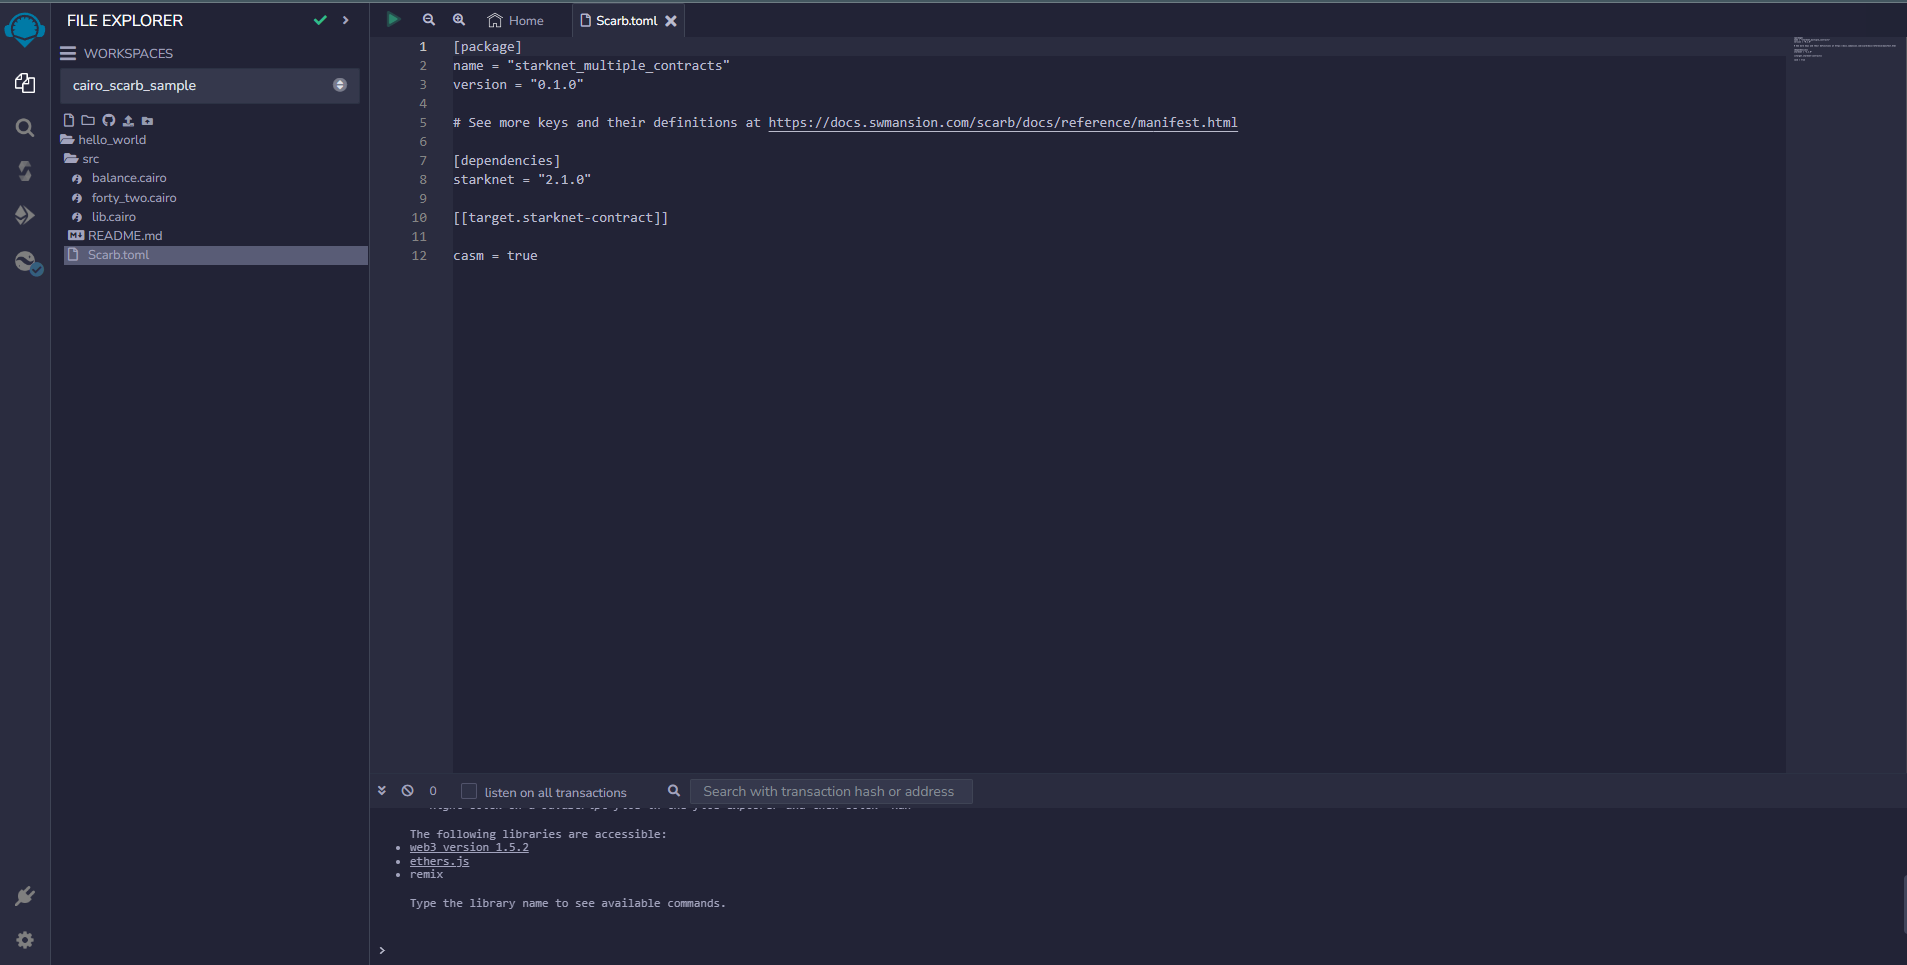
Once you've activated the plug-in, you can access the Hello World project that Remix prepares by default from the workspace. If we examine the file structure of this project,
The
scarb.tomlfile can be thought of as the configuration file for your project, similar to thepackage.jsonfile in Node.js, where you specify the necessary configurations and dependencies for your project. For example, in this file, you can see that Starknet version 2.1.0 is being used as indicated by the linestarknet = "2.1.0".[package] name = "starknet_multiple_contracts" version = "0.1.0" # See more keys and their definitions at https://docs.swmansion.com/scarb/docs/reference/manifest.html [dependencies] starknet = "2.1.0" [[target.starknet-contract]] casm = trueUnder the
srcfolder, you'll find three different smart contracts. Similarly, when you develop with Cairo in the future, you'll organize your contracts under thesrcfolder, just as they are here.- The
lib.cairofile can be thought of as a file where modules are added and stored. You can add or remove as many modules as you like to this file. In our example, two modules, "balance" and "forty_two," have been added to thelib.cairofile.
- The
        mod balance;
        mod forty_two;
If we take a look at the
balance.cairofile,#[storage] struct Storage { value: u128, }A variable named
valueis defined here, which allows for tracking the balance in the contract. Theu128data type represents a 128-bit integer in this context.#[constructor] fn constructor(ref self: ContractState, value_: u128) { self.value.write(value_); }The
Constructorsets thevalue_parameter as the contract's balance.#[external(v0)] impl Balance of super::IBalance<ContractState> { fn get(self: @ContractState) -> u128 { self.value.read() } fn increase(ref self: ContractState, a: u128) { self.value.write( self.value.read() + a ); } }This part may look a bit complex, but let's break it down step by step,
The
#[external(v0)]line indicates that thegetandincreasefunctions defined below can be called externally.The
getfunction allows us to read the current balance of the contract without making any changes to the contract.The
increasefunction helps us increase the contract's balance by a specified valuea.
The
forty_two.cairocontract, on the other hand, returns a fixed value of 42 in response to a call.
        #[starknet::contract]
        mod FortyTwo {
            #[storage]
            struct Storage {}

            #[external(v0)]
            fn answer(ref self: ContractState) -> felt252 {
                42
            }
        }
We've briefly discussed our contracts, and now it's time to deploy these contracts to the testnet. To do this, follow these steps,
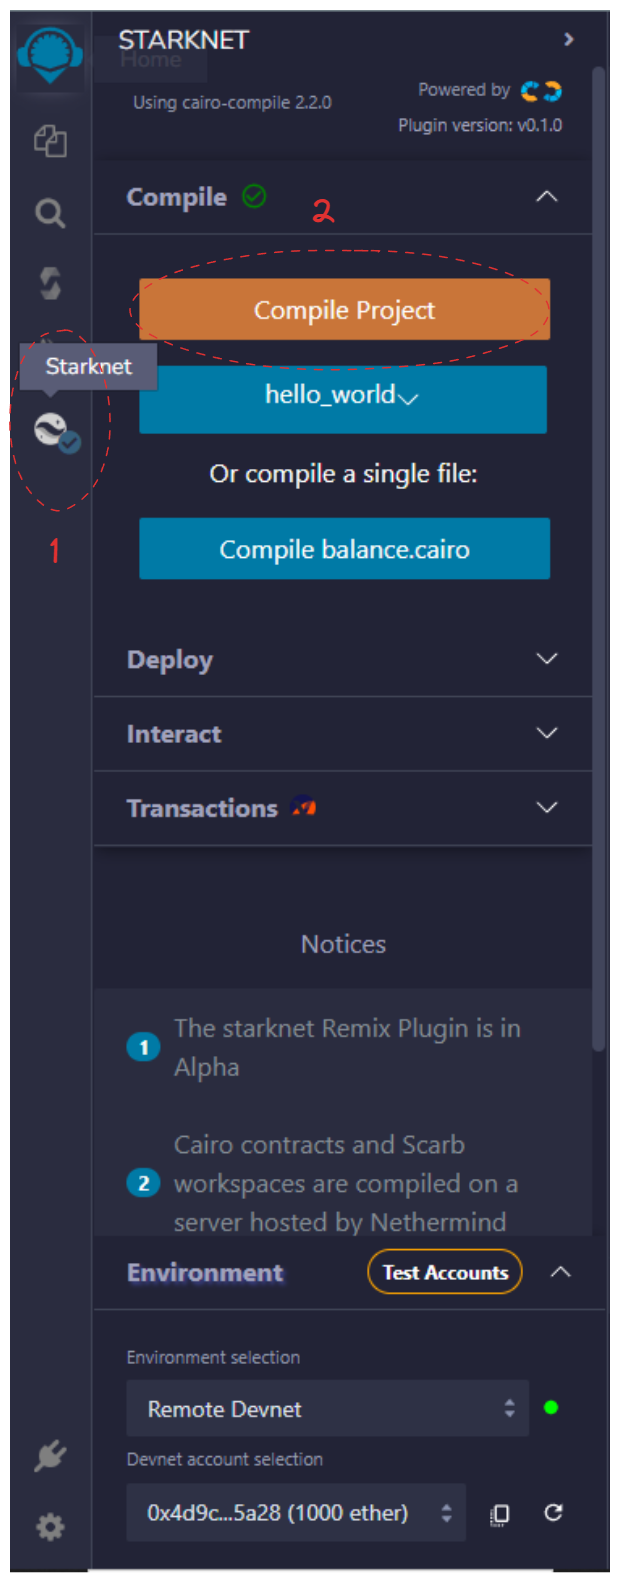
Open the Starknet tab from the left menu.
Click the "Compile" button to compile your "hello_world" project.
If everything goes smoothly, you should see a green checkmark next to the "Compile" text, as shown in the image below.
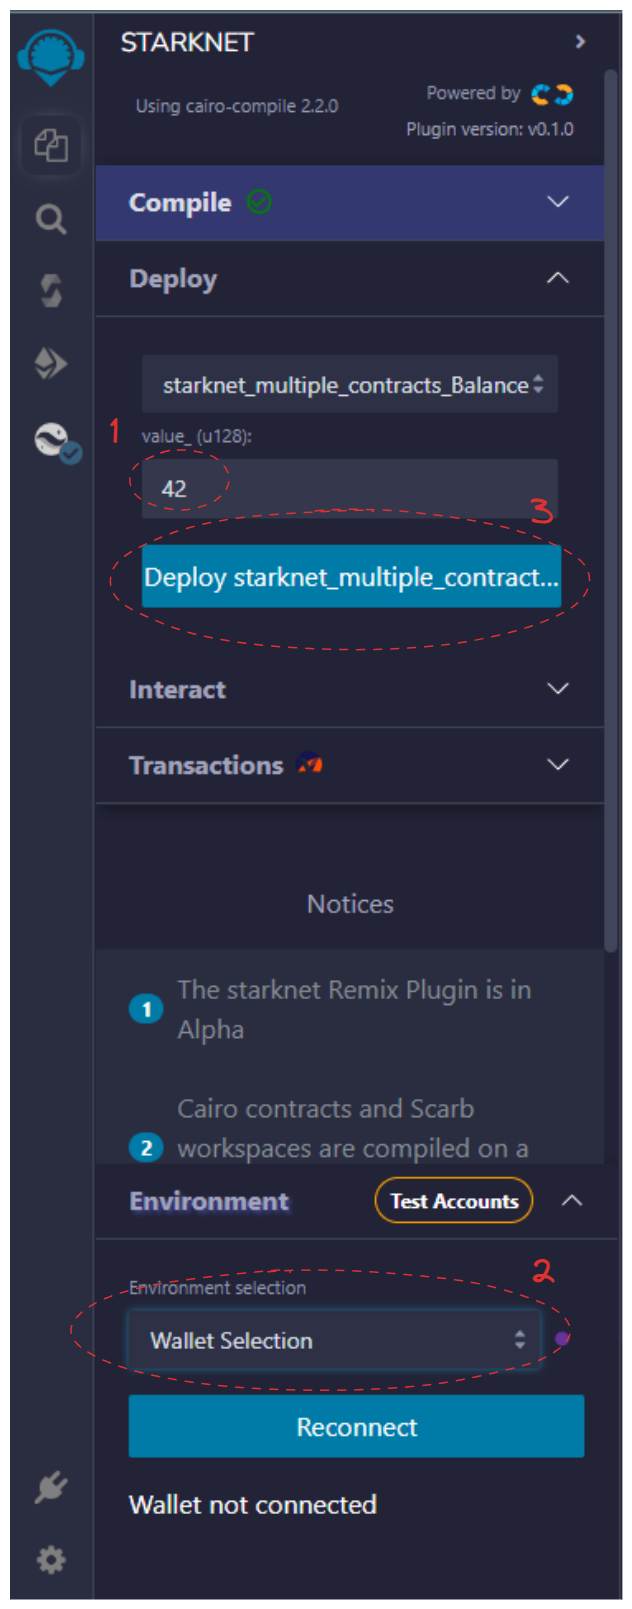
We're done with the "Compile" tab, and now we can deploy our contract to the testnet under the "Deploy" tab located just below the "Compile" tab. Follow these steps,
As mentioned earlier, you need to define the
value_parameter here. As an example, we're setting it to 42.In the "Environment Selection" section below, select the "Wallet Selection" option to connect your Braavos wallet.
Finally, click the "Deploy" button, and after that, click the "Deploy" button in the Braavos notification that appears on the right. This will deploy your contract to the testnet.
If everything goes well, you can see your smart contract address and transaction hash in the console. You can also check your contract on Starkscan.
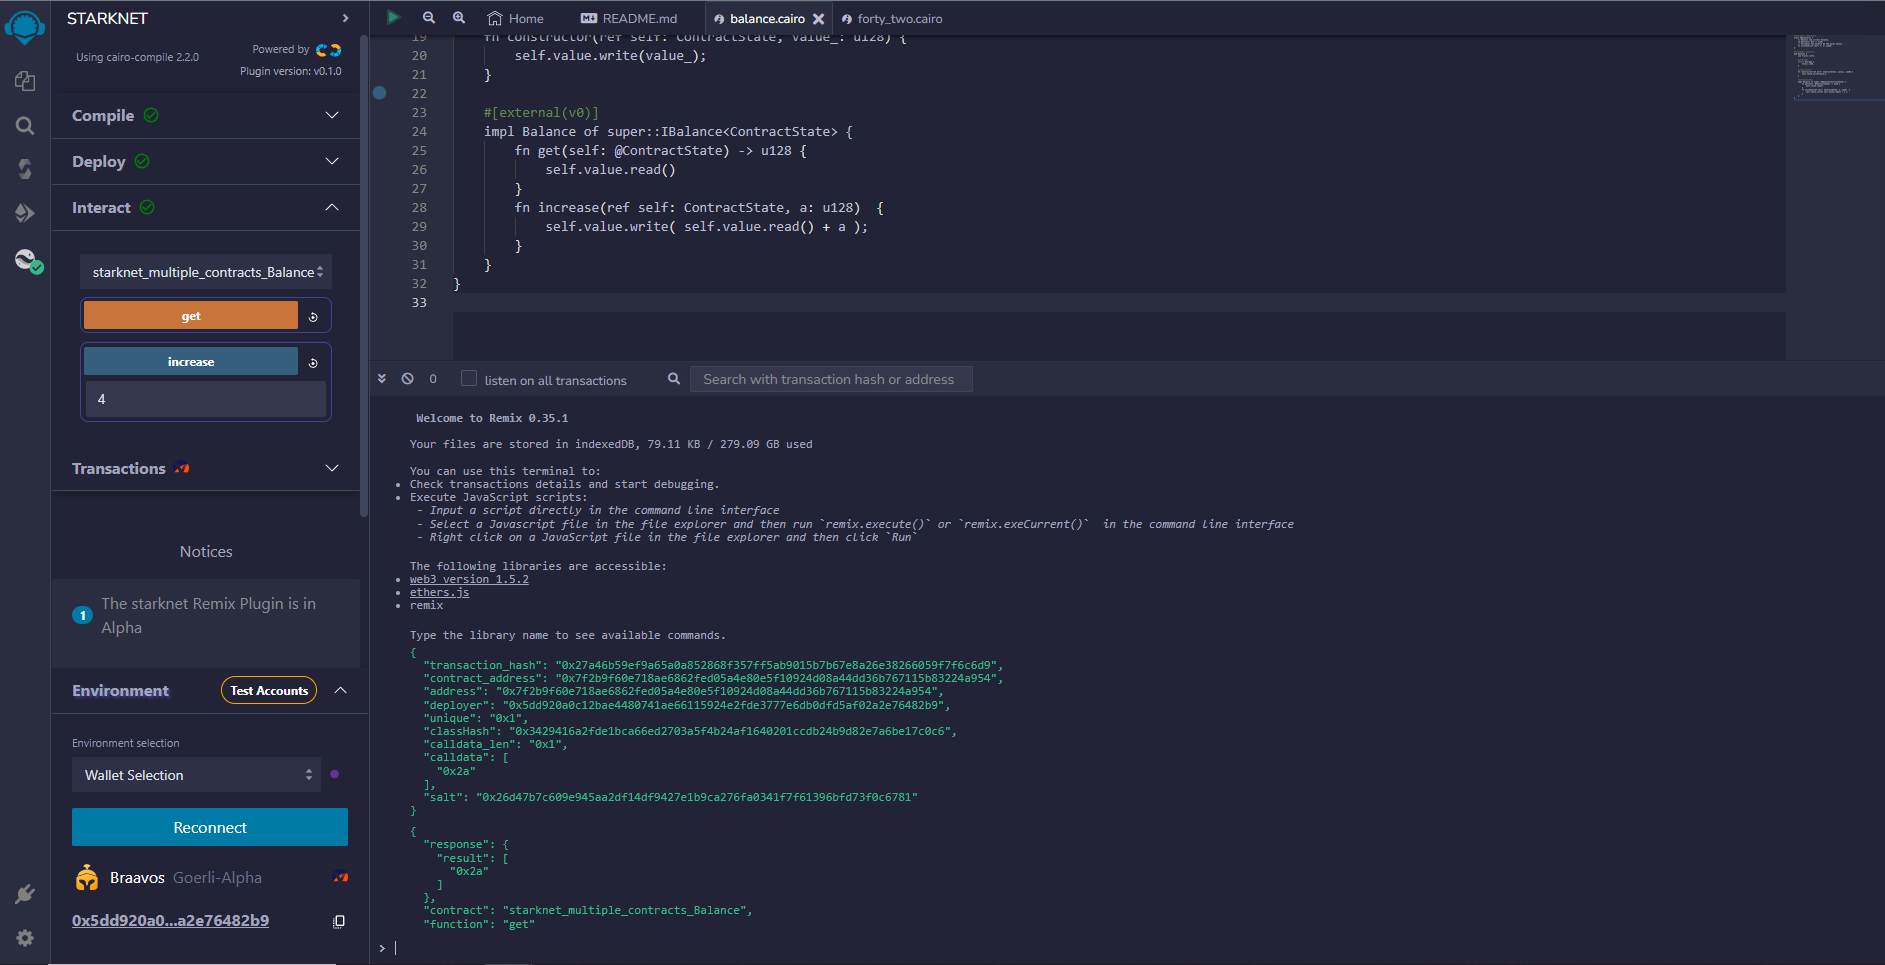
Here is my contract address and transaction hash:
Smart Contract:
0x7f2b9f60e718ae6862fed05a4e80e5f10924d08a44dd36b767115b83224a954,Transaction Hash:
0x27a46b59ef9a65a0a852868f357ff5ab9015b7b67e8a26e38266059f7f6c6d9,
We can interact with our contract both through Remix and Starkscan. Let's explore how to interact with a smart contract using Starkscan for a bit of experience 👀
First, go to https://testnet.starkscan.co/ and search for your smart contract address. Once you find it, click on the "Read/Write Contract" tab to interact with it.
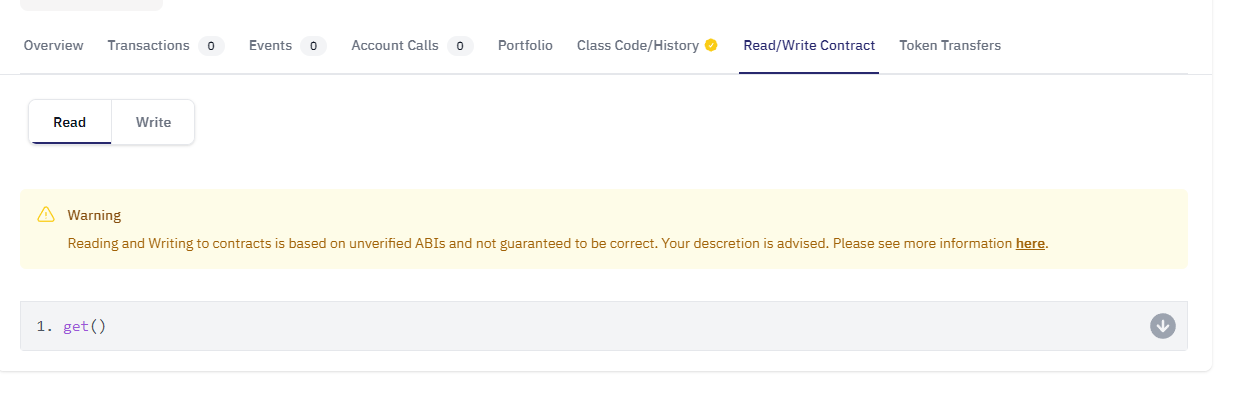
If you recall, when we created our contract, we defined two functions: "get" and "increase." We mentioned that the "get" function allows us to read the contract's balance without making any changes, while the "increase" function lets us increase the contract's balance by a specified amount. Now, let's see it in action!
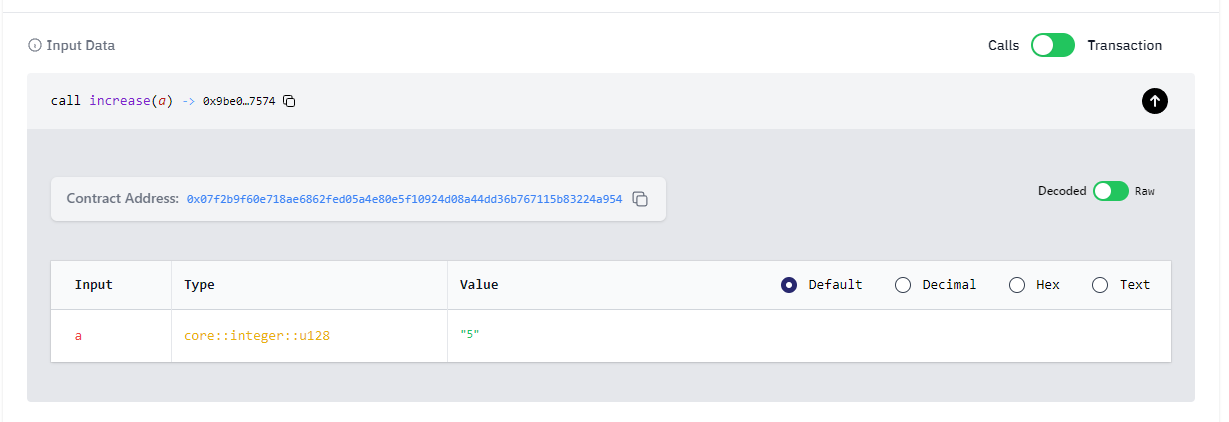
- First, let's interact with the blockchain. Go to the "Write" tab, and click on the downward arrow next to the "increase(a)" function. In the pop-up that appears, enter any amount (for example, "5"), connect your wallet from the "Connect Wallet" option, and then click the "Write" button. Sign the notification that appears in your Braavos wallet, and then track your transaction again via Starkscan.
My transaction link,
Once you find your transaction link, scroll down the page a bit, go to the "Input Data" tab, and check the amount you entered there.
If you remember, when we deployed our contract, we initially set the value_ parameter in the constructor to 42, and we just increased it by 5. Let's go back to the "Read" tab and check the contract balance.
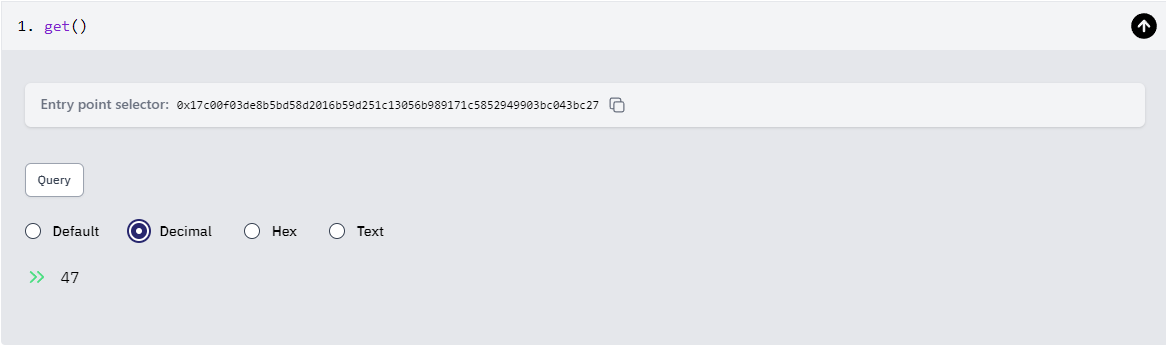
As you can see, our new balance has been updated to the expected value of 47.
In this way, we deployed our own smart contract to the blockchain, performed a transaction on this contract under the write tab to update the contract balance, and finally used the get function under the read tab to read this change from the blockchain and view our new balance.
Last Words 🗨️
It was a fantastic and highly informative introductory lesson to the Starknet ecosystem for me. I believe we had the opportunity to cover various different aspects, and I intend to share what I did every week in the form of articles if I can find the opportunity for the next 7 weeks. Even as I was creating this article, I learned many new things, and I hope this article can be as informative for you as it was for me. Finally, I conclude my writing by thanking the StarkHubTR team for their efforts.


